TL;DR. Re-ran the pipeline behind Higgsfield’s AI-made shooter with Claude Code on one Mac mini, building monsters, a rifle, a level and a UE5 boss fight with unattended agent runs. Cost: about 4.7 hours and $68. By hand: an estimated 50–80 person-days and $21,000–55,000. Potential gap: the result has not yet been compared against hand-made art or tested with players. But promising: every build ran unattended from a prompt, so going from a game idea to something playable can take hours instead of weeks.
Key results at a glance
- Hours, not weeks. All the assets and both games took about 4.7 hours and $68 of agent time, against an estimated 50–80 days of work by hand.
- A reference video helps with shape, not counting. The monster built from the turntable video followed its shape, but the video drew too few legs, so the leg count had to come from the text.
- The agent can rig a model it didn’t build. Adding a skeleton and animations to a ready-made Tripo model cost about the same as building one from scratch.
- The models work in real games. They went into a browser game and into Unreal Engine 5 without hand fixes, running at 50–60 frames per second.
- The agent checks its work from screenshots only. It never watched its animations play, so problems that show only in motion can slip through.
Motivation
This study is inspired by Higgsfield’s post “Fable 5.2 Built a Playable Sci-Fi Shooter in 3.5 Hours”, which shows Claude Code turning a 360° video of its enemy into Blender models and then into an Unreal Engine 5 game, shared as one original prompt and a 25-second gameplay clip. The goal here is to measure what that demo doesn’t show: what each step costs, how long it takes, how many tries it needs, and how much of it runs with no one helping.
Coding Agent for Game Pipeline
The pipeline runs from a turntable video through 3D assets and rigging to two playable games, each box one unattended agent run.
Scroll sideways to see the whole graph →
Setup
I chose what to build, which routes to compare and when to stop. A separate Claude Code session, which I call the supervising session, turned those choices into prompts and launched the runs. Apart from the Kling video and the Tripo meshes, every asset and game came from headless claude -p runs on Fable 5.2, fully unattended once launched, all on one Mac mini (Apple M5, 16 GB). Each run builds, renders, checks its own pictures and fixes what is wrong, round after round. Claude costs are API-equivalent prices; fal costs are what fal billed. Prompts are in the appendix.
1. Reference: the turntable video
Kling made the turntable in one take (4 min, $2.35), but drew three or four legs per side instead of five. Rather than retry, the modeling prompt says the text wins on anything countable: use video for shape, text for counts.
2. 3D assets
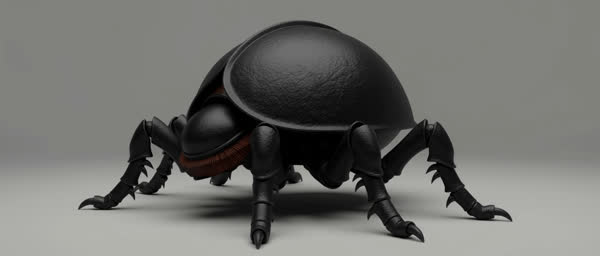
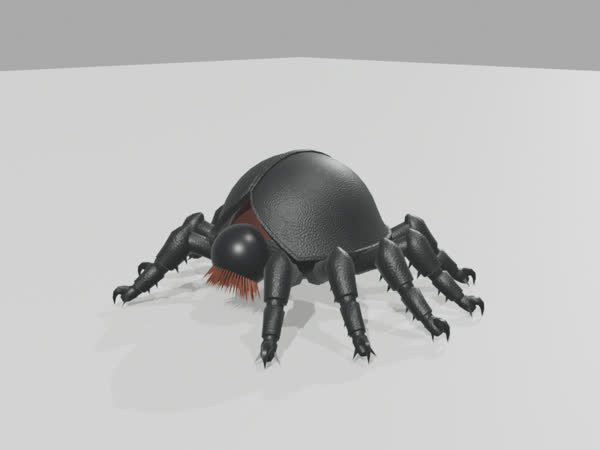
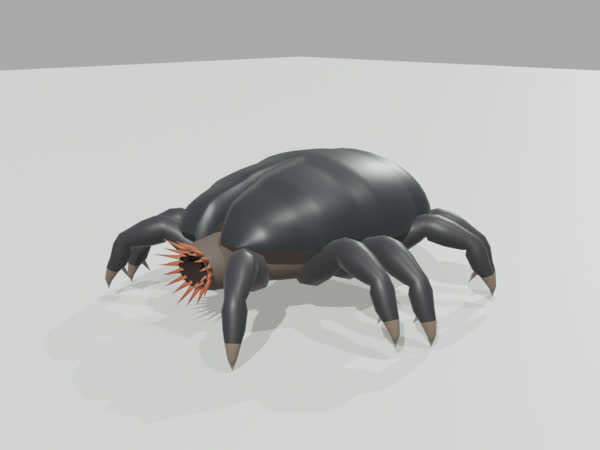
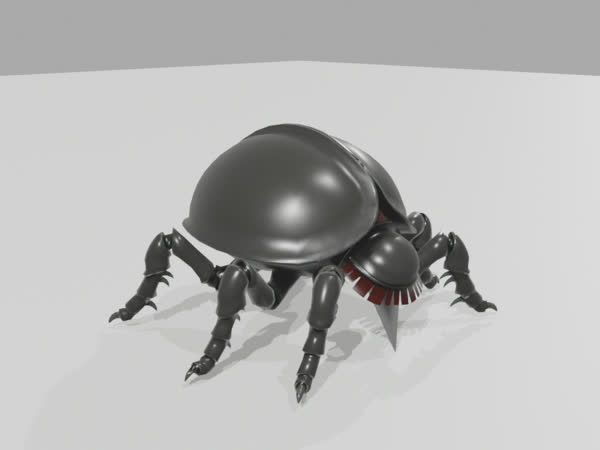
The monster, four ways
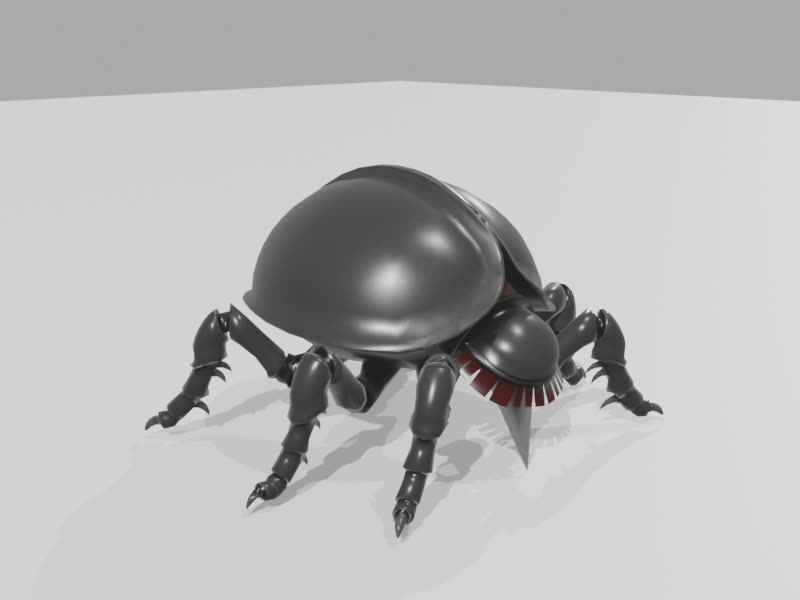
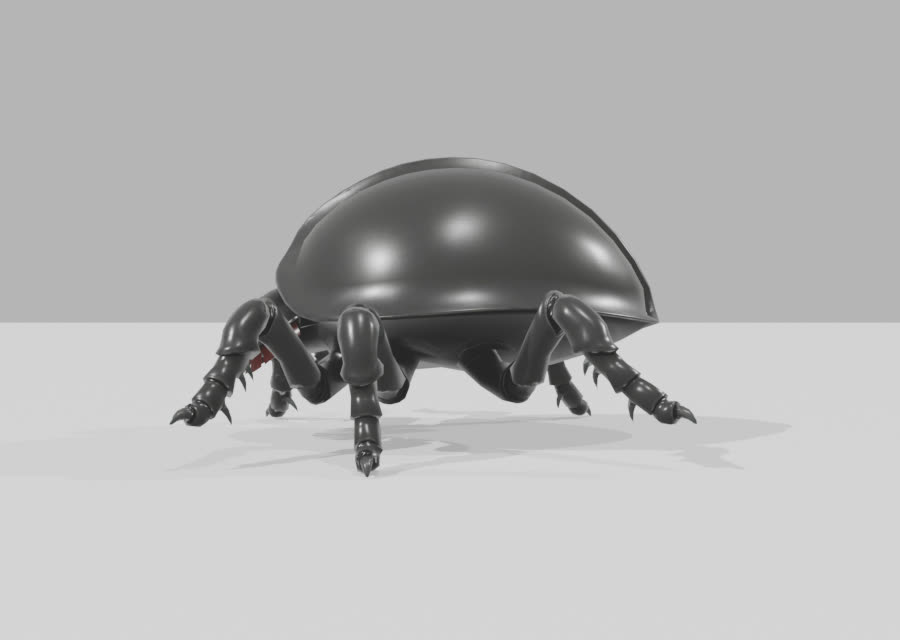
Same monster description, four routes. Only the Blender routes produce a skeleton and animations; Tripo is fastest but its meshes cannot move on their own.
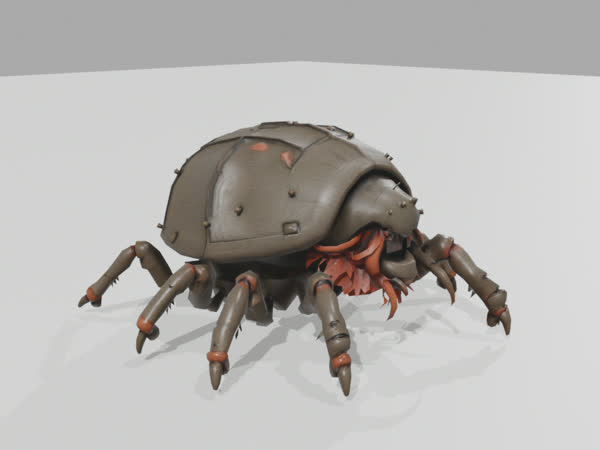
| Route | Time | Cost | Self-fix rounds | What came out |
|---|---|---|---|---|
| Blender, text only | 8.7 min | $3.47 | 4 | 10 legs, 3.9k triangles, skeleton, walk and die |
| Blender, from video | 13.1 min | $5.15 | 4 | 10 legs, 10.3k triangles, skeleton, walk and die |
| Tripo, text | 1.7 min | $1.10 | – | textured mesh, no skeleton |
| Tripo, video frame | 1.6 min | $1.10 | – | textured mesh, 6 legs, no skeleton |
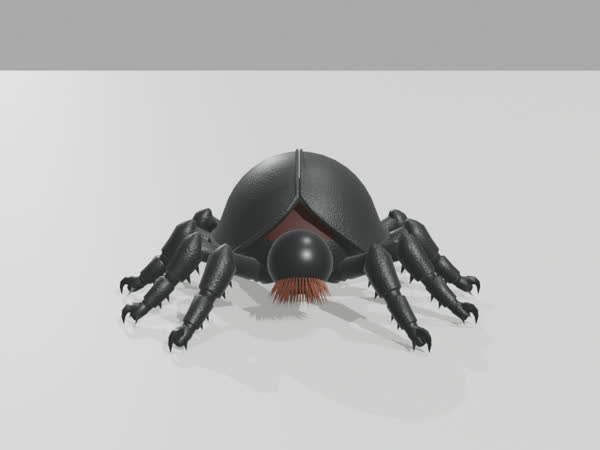
Viewer lighting and scaling were added for this page, not by the agent.
Rifle, level kit and boss
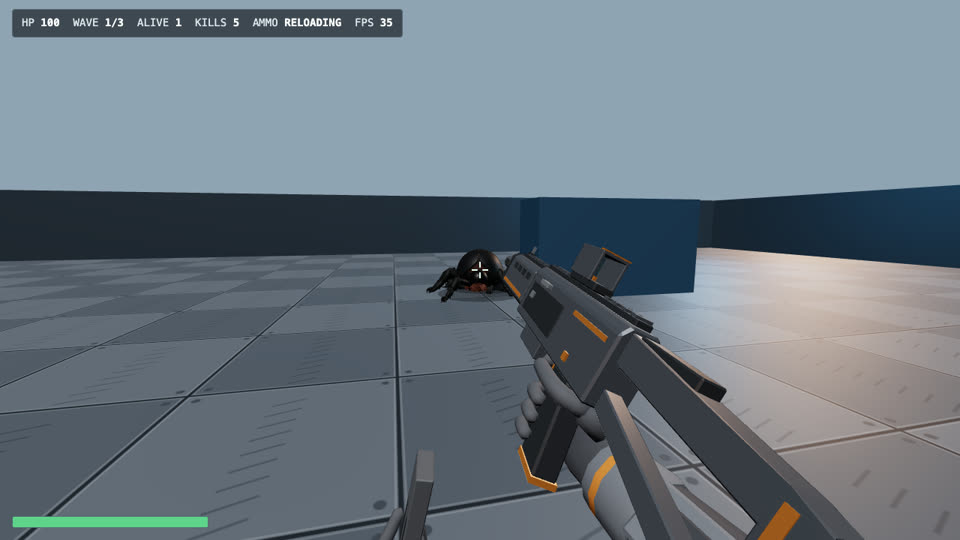
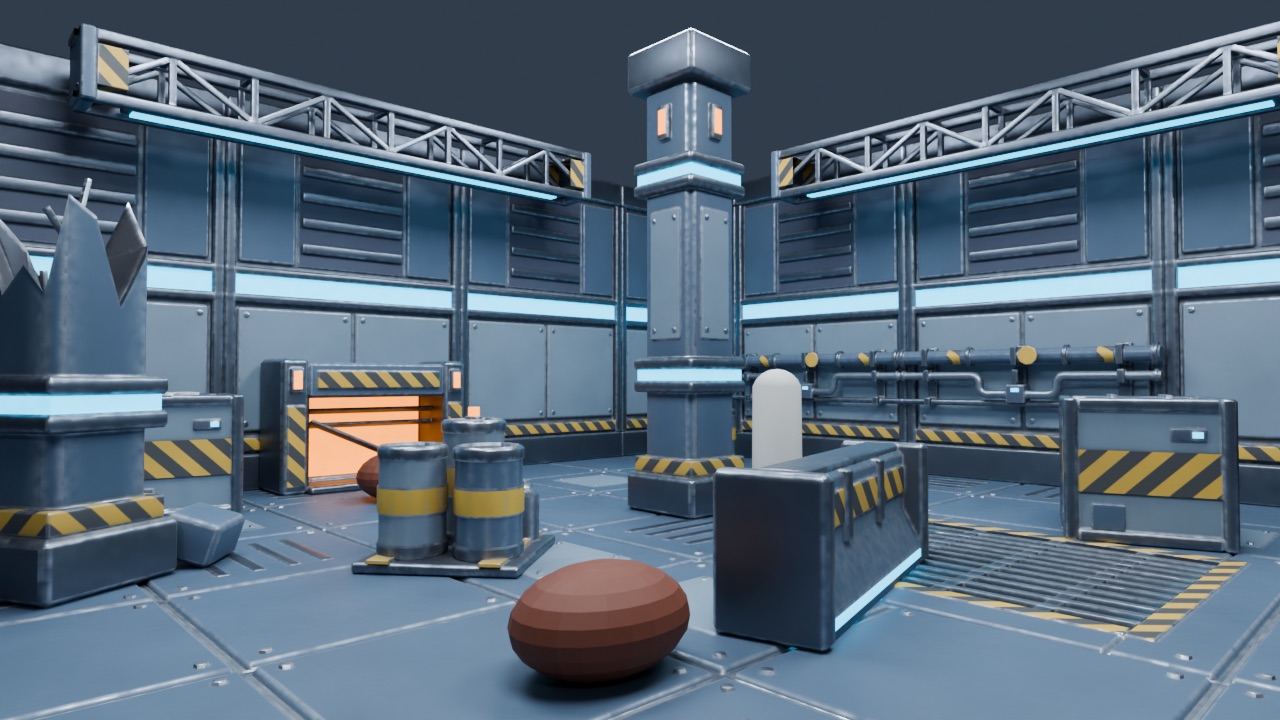
The rifle with arms was the most expensive asset (35.8 min, $8.42); the run also wired it into the three.js game. The level kit (56 min, $6.48) and boss (31 min, $7.30, 59 bones, joints rigidly attached) ran in parallel for the Unreal art pass.
3. Rigging: a generated mesh
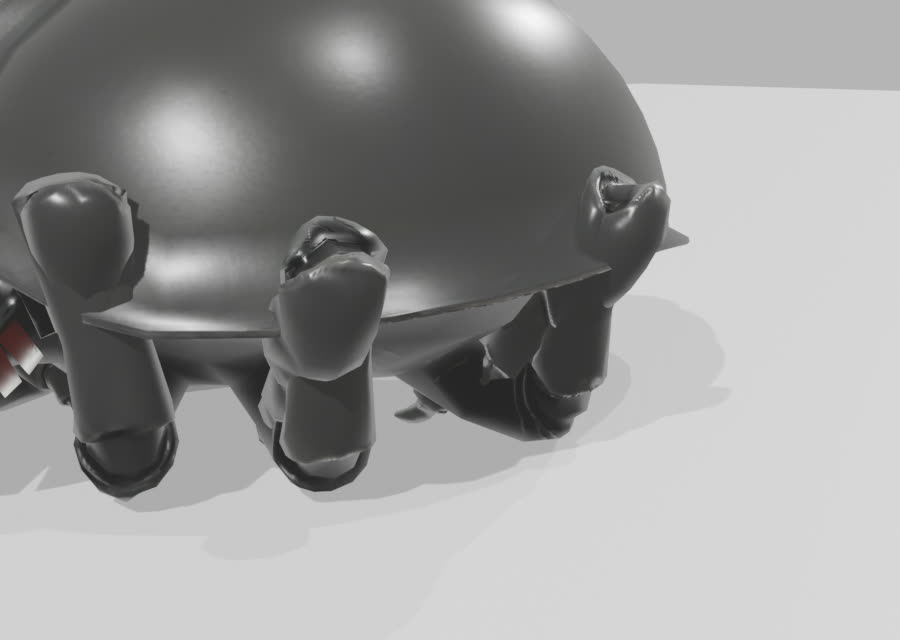
The agent added a skeleton and walk and die animations to Tripo’s mesh without remodeling it (10.7 min, $4.76). With Tripo’s fee that is $5.86, about the same as modeling from scratch, and it is lighter to render. Rigging cannot fix shape: the mesh kept the video frame’s six legs.
4. Games
three.js shooter
The agent built a browser shooter around its monster and play-tested it with a bot (17.6 min, $4.63). Things checkable in a screenshot came out right; problems only visible in motion were not caught.
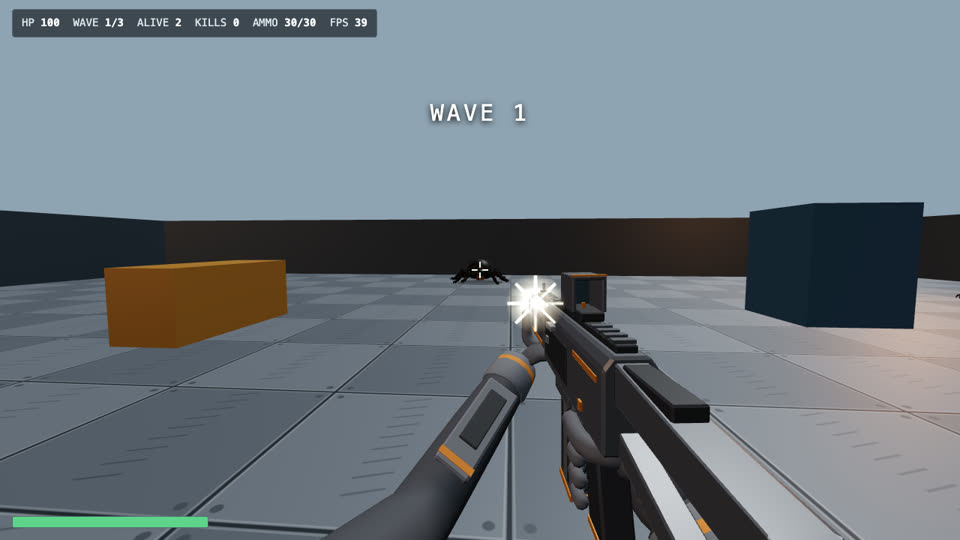
Desktop: WASD, mouse, click or Space to fire, R to reload. Or open the Tripo monster or watch the bot in a new tab. The Tripo switch was added later by the supervising session.
| Check | Measured |
|---|---|
| Scale and direction | no fix needed |
| Foot slip | 0.009 m/s |
| 20 monsters at once | 50 fps (measured by the supervising session on the Mac mini) |
| Death animation | body sinks 15 cm, legs stay planted |
| Idle, attack, hit animations | none made |
Unreal
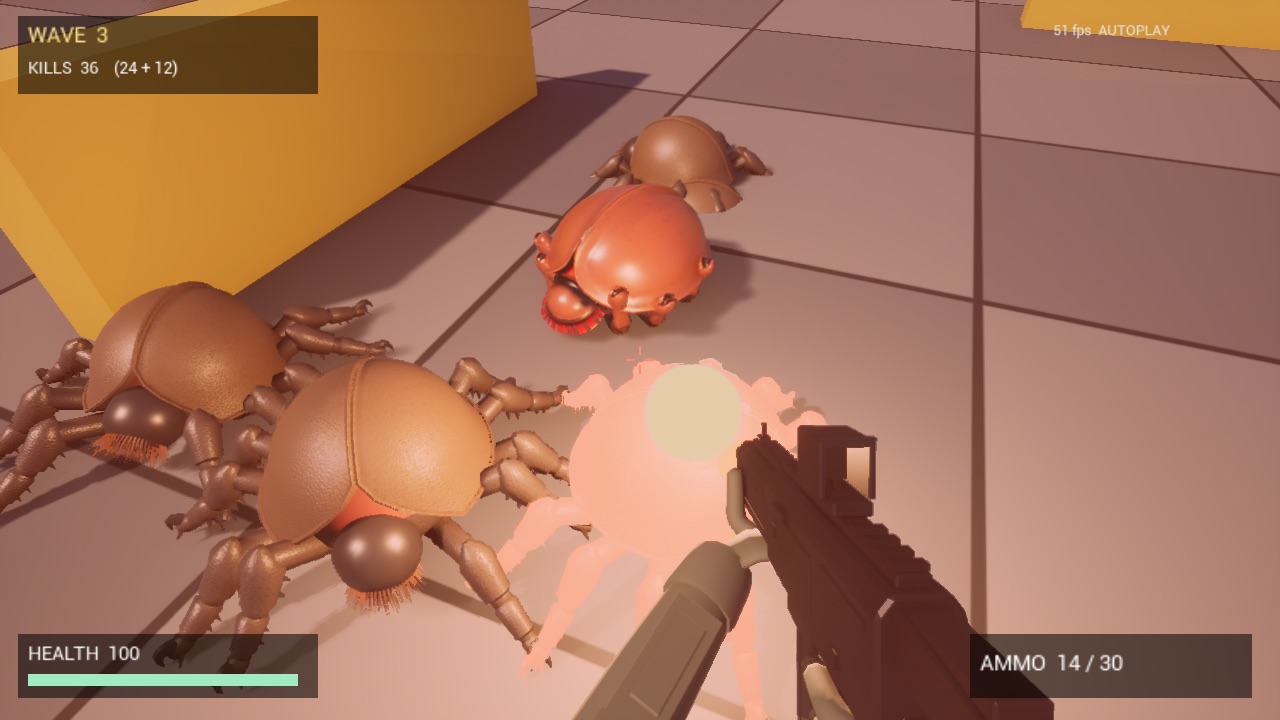
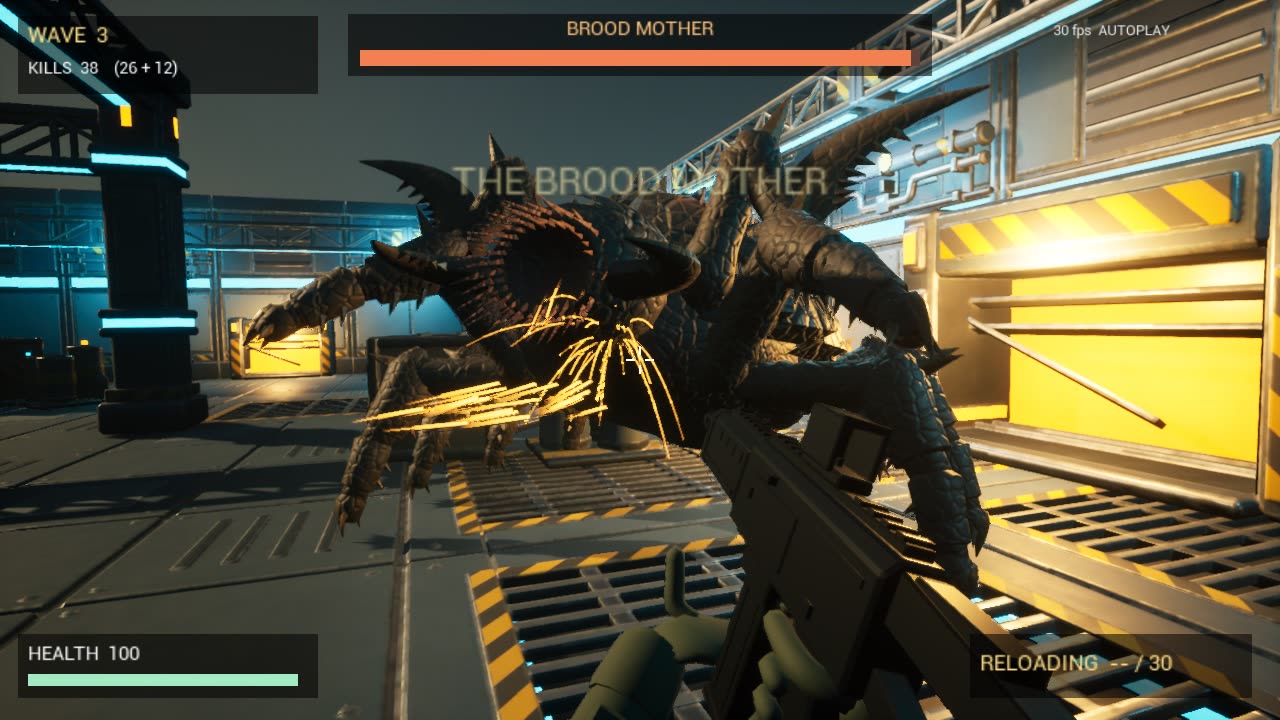
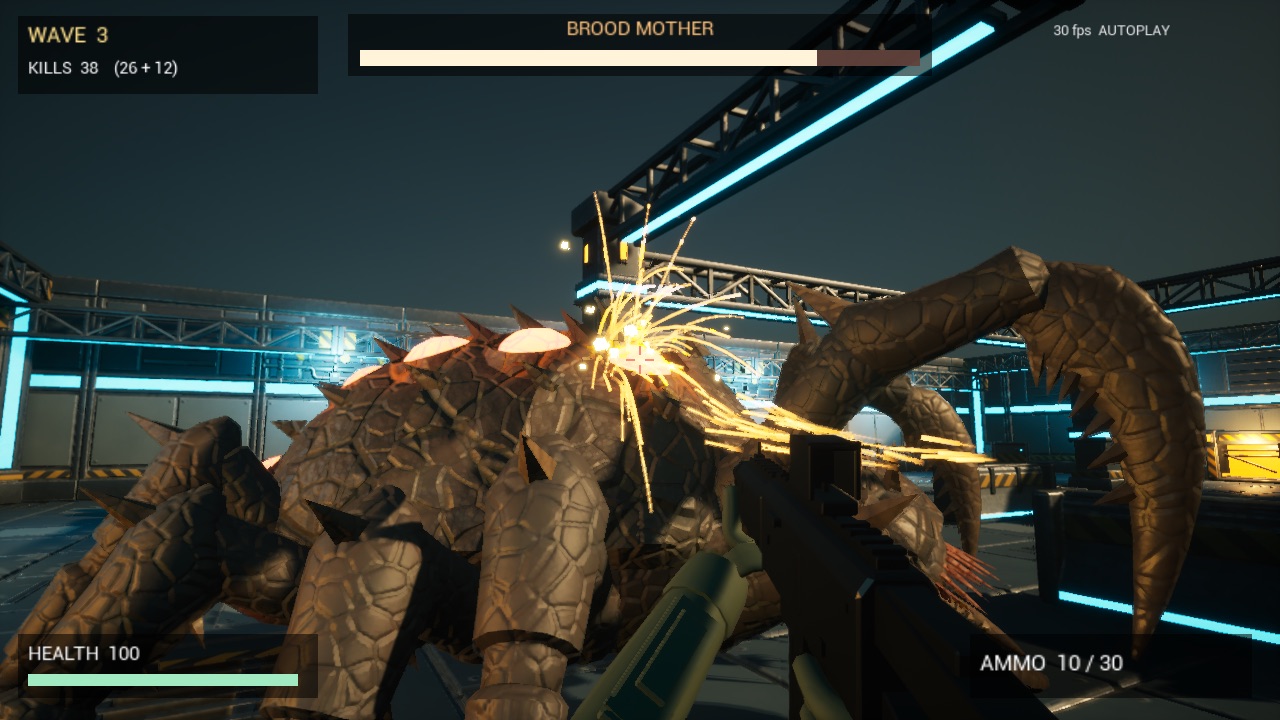
The supervising session installed Unreal, solved four macOS setup issues once, and wrote a wrapper so a run could build and play without opening a window. The greybox run (33 min, $9.07, 10 rounds) imported all three models intact and hit 57.9 fps with 0 errors. The art pass (77 min, $14.12, 11 rounds) added the kit, the boss, effects and the video at the top, at 55–60 fps with Lumen off.1 The supervising session re-ran both and got matching results.
Cost: agent vs. by hand
| What was built | Time | Cost | By hand (person-days) |
|---|---|---|---|
| Turntable video (Kling) | 4 min | $2.35 | – |
| Monster, from video (Blender) | 13.1 min | $5.15 | 6–8 |
| Monster, text only (Blender, comparison) | 8.7 min | $3.47 | – |
| Tripo meshes ×2 | 3.3 min | $2.20 | – |
| Second monster: rig the Tripo mesh | 10.7 min | $4.76 | 2–3 |
| Rifle and arms | 35.8 min | $8.42 | 8–12 |
| Level kit, 12 pieces | 56 min | $6.48 | 8–12 |
| Boss | 31 min | $7.30 | 13–20 |
| three.js game | 17.6 min | $4.63 | – |
| Unreal greybox: gameplay code and bot tests | 33 min | $9.07 | 8–12 |
| Unreal art pass: level, lighting, effects, video | 77 min | $14.12 | 7–11 |
| Total | 4.8 h | $67.95 | about 50–80 |
The 4.8 h total is 4.7 h of agent runs plus 7 minutes of Kling and Tripo generation. Cost is $63.40 of Claude at API-equivalent prices plus $4.55 billed by fal; it leaves out installing Unreal, the supervising session and my time. By-hand figures are estimates from typical industry hours for mid-level indie work, not quotes, and come to roughly $21,000–55,000 at freelance rates.
Limitations and next steps
- One run per route, so no error bars.
- Kling, not the Higgsfield MCP, for the video.
- No human evaluation of how the models look.
- Self-checks from stills only; next, let runs watch their own animations.
- No browser build of the Unreal game yet (UE 5.9’s web target is experimental).
1 The first art-pass attempt was stopped after 16 minutes by the computer's memory manager because an old 7 GB editor was still open; it was restarted unchanged.
This post was drafted by Claude and reviewed and edited by me.
Appendix: prompts
Every prompt below is the one the headless runs received, verbatim except that local paths are shown as <workdir> and two C++ class names lightly renamed. All runs used claude -p --model claude-fable-5-2.
Creature description (shared by every route)
The Scuttler: a ten-legged alien swarm enemy like a giant armored tick. Low, heavy body; domed charcoal-black shell split down the front; five thick clawed legs on each side; no eyes; a dark mouth ringed with reddish-brown bristles. About 1.2 m long.Turntable video (Kling v4 on fal)
Settings: duration 10, aspect_ratio 21:9, resolution 1080p.
Turntable reference video for a game creature. The camera orbits a full 360 degrees around a ten-legged alien creature that looks like a giant armored tick: low heavy body, domed charcoal-black shell split down the front, exactly five thick clawed legs on each side, no eyes, a dark mouth ringed with reddish-brown bristles. The creature stands still on a plain grey floor against a plain grey background, even soft studio lighting, the whole body always in frame, smooth constant orbit speed, no text, no other objects.Blender modelling, rigging and animation (both arms)
The two arms differ only in the REFERENCE line. Text-only arm: "There is no reference video for this arm: work from the text only." Video arm: "Reference: `../out/scuttler-v1.mp4`, a 10 s 360° turntable of the creature (2200x940, 24 fps). Sample frames are in `../frames/` (v1-t<seconds>.png); extract more with `ffmpeg` if you need other angles. Use the video as the blueprint for shape, proportions, shell, mouth and leg design. The video model drew fewer legs than asked: where it disagrees with the text on leg count, the text wins (five legs per side). Compare your renders against matching video frames each round."
You are building one game-ready enemy for a three.js first-person shooter. Work only in this folder.

Creature: see ../creature.txt.
REFERENCE

Do this with Blender in background mode (`blender -b -P script.py`), writing your own bpy scripts:
1. Model the creature as `scuttler.blend`: real-time friendly (under 15k triangles), simple PBR materials, origin at ground centre, facing -Y, metres, standing on z=0.
2. Rig it: one armature, a bone chain per leg plus body/head, skinned weights.
3. Animate two actions: `walk` (looping, 1 s, alternating tripod-like gait across all ten legs) and `die` (collapse, 1 s).
4. Export `scuttler.glb` (glTF binary, animations included, +Y up).
5. Check your own work: run `blender -b -P ../render_views.py -- scuttler.glb views/v<N>` and look at the PNGs. Compare to the reference. If something is wrong (leg count, proportions, floating parts, broken weights), fix and re-render. Record each round in `rounds.md`: what you saw, what you changed.
Stop after the model matches the reference or after 4 rounds. End with a one-paragraph honest assessment of quality in `rounds.md`.
Playable three.js game
Build a small playable three.js first-person shooter in this folder that uses the enemy model `scuttler.glb` (already here). The point is to find out whether this generated asset actually works in a real game, so be honest about what does not.

Asset facts (from its build log): one skinned mesh, 45 bones, clips `walk` (1.0 s loop, in place, 0.30 m stride, matches 0.6 m/s ground speed at timeScale 1) and `die` (1.0 s, hold last frame). Stands on y=0, about 2.5 m wide over the legs, 1.4 m long body, 1.06 m tall. Faces +Z in glTF space.

Game ("Scuttler Swarm"):
- Files: `index.html` + `main.js` (ES modules). three.js 0.170.0 from unpkg via an importmap (`three` and `three/addons/`). No build step, no other dependencies.
- A ~40 x 40 m metal station deck with a few cover blocks, simple lights, light fog.
- Player: first-person camera at 1.7 m, WASD move, mouse look with pointer lock on click; if pointer lock is refused, drag-to-look still works. Left click or Space fires a hitscan rifle (raycast). Crosshair, simple muzzle flash, 100 HP.
- Enemies: load the GLB once, clone per enemy with `SkeletonUtils.clone`, own AnimationMixer each. Waves of 6, 12 and 20. They walk toward the player across the deck, turning to face their direction of travel, with walk timeScale = speed / 0.6 so feet do not slide. Use a cheap invisible hit proxy (not per-triangle skinned raycast). 3 hits kill: play `die` once, clamp, stop moving, remove after 3 s. Within 1.8 m they bite the player (damage over time).
- HUD: HP, wave, kills, FPS. Win screen after wave 3, lose screen at 0 HP, restart button.
- Test hooks: `?auto=1` runs a bot that stands still, aims at the nearest living enemy and fires every 0.25 s, so a headless browser can play a full game. Expose `window.__game = { state, wave, alive, kills, playerHp, fps, drawCalls, triangles, enemyScale, walkTimeScale }`, updated every frame.

Checking your work (a static server is already running on http://127.0.0.1:8767/ serving this folder):
`node ../probe.mjs "http://127.0.0.1:8767/?auto=1" shots/r<N> 20` loads the page in headless Chrome (SwiftShader WebGL, so FPS is far below a real GPU; compare relative numbers only), prints console errors and `window.__game`, and saves three screenshots `shots/r<N>-1..3.png`. Look at the screenshots. Check: no console errors, enemies readable at a sensible size relative to the player, walking forward (not sideways or backwards), legs animating, deaths playing, waves advancing, HUD correct. You may add more probe runs (e.g. without auto, or a longer duration) and other query flags for debugging.

Fix and re-check up to 4 rounds. Record each round in `rounds.md` (what you saw, what you changed). Finish `rounds.md` with: the final `window.__game` numbers at wave 3, and an honest assessment of the asset in a game — scale, orientation, foot sliding, how the walk and die read in motion, clipping, performance with 20 enemies (draw calls, triangles), and what would need fixing in the model itself versus in game code.
First-person rifle and arms
You are building the first-person weapon (viewmodel) for a three.js shooter, then putting it into the game. Work only in this folder and in `../game-fp/`.

Part A — the asset, with Blender in background mode (`blender -b -P script.py`), writing your own bpy scripts:
1. Model `fp_rifle.blend`: a compact sci-fi assault rifle (gunmetal body, orange accents, boxy receiver, short barrel with a muzzle brake, detachable magazine, simple optic) held by two forearms + hands in dark armoured sleeves and gloves. Right hand on the grip with index finger by the trigger, left hand on the handguard. Real-time friendly: under 12k triangles total, at most 2 materials (one for rifle, one for arms; colour variation by vertex colour or UV regions), base colours not darker than about 0.08 linear so it reads in a dim scene. Metres, real size (rifle ~0.75 m long).
2. Viewmodel space: the camera is at the origin looking down -Y (Blender) = -Z in glTF/three.js, +Z up. Place the rifle so that with a 72° vertical-FOV camera at the origin it sits lower-right, barrel pointing forward, both hands visible, nothing poking through the near plane (0.05 m). Add an empty named `Muzzle` at the muzzle tip (parented so it follows the rifle).
3. Rig: one armature `ViewRig` with a root, upper/forearm/hand bones for both arms, at least simple finger bones (one per finger is fine), a `Weapon` bone the rifle mesh is rigidly bound to, and a `Mag` bone the magazine is bound to. Skinned weights for the arms.
4. Animate four actions, all in place: `idle` (2 s loop, subtle breathing sway), `fire` (0.15 s, sharp recoil kick back and up, returns to rest), `reload` (2.0 s: left hand pulls the magazine down and out, brings it back, inserts, slaps; magazine follows the hand), `draw` (0.5 s, raise from below the screen).
5. Export `fp_rifle.glb` (glTF binary, animations included, +Y up). Keep `Muzzle` as a node in the export.
6. Check your own work each round: render from the viewmodel camera (72° vertical FOV, 16:9, at origin) at rest and at mid-frames of `fire` and `reload`, plus one three-quarter side view of the whole rig. Look at the PNGs. Fix floating hands, fingers through the grip, broken weights, magazine not following the hand, rifle clipping the near plane.

Part B — the game. `../game-fp/` is a working three.js FPS ("Scuttler Swarm": `index.html` + `main.js`, three.js 0.170.0 via importmap). Its gun is currently two grey boxes attached to the camera (search `main.js` for `gun`). Replace that with `fp_rifle.glb` (copy it into `../game-fp/`): attach it to the camera, own AnimationMixer, play `draw` on start then loop `idle`; on each shot play `fire` (restartable, crossfade back to idle) and put the muzzle flash at the `Muzzle` node; press R to reload (play `reload`, no firing while reloading); magazine of 30 rounds shown in the HUD, auto-reload when empty. Keep existing behaviour and test hooks (`?auto=1` bot, `window.__game`). Add to `window.__game`: `ammo`, `reloading`, `viewmodelTris`, `viewmodelDrawCalls`, `weaponClip` (name of the playing action).
A static server is already running at http://127.0.0.1:8769/ serving the parent folder. Check with `node ../probe.mjs "http://127.0.0.1:8769/game-fp/?auto=1" ../game-fp/shots/r<N> 20` (headless Chrome, SwiftShader so FPS is low; prints console errors and `window.__game`, saves 3 screenshots). Look at the screenshots: rifle visible lower-right at a believable size, hands on it, flash at the muzzle, reload happening, no console errors. You may add query flags for debugging (e.g. `?pose=reload` to freeze a clip mid-way for screenshots).

Up to 4 rounds total across both parts. Record each round in `rounds.md` (what you saw, what you changed). Finish `rounds.md` with an honest assessment: how the viewmodel looks in game, how each clip reads, hand/finger contact, scale, cost (triangles, draw calls), and what would still need a human or another pass.
Rigging the Tripo mesh
You are turning a generated 3D mesh into a game-ready, animated enemy for a three.js shooter. Work only in this folder.

Input: `source.glb`, made by Tripo (image-to-3D) from a frame of a turntable video. It is one textured mesh (about 5.4k faces), no rig, no animation, arbitrary scale and orientation. Creature description: `../creature.txt` (the design says five legs per side; the mesh may have fused, missing or extra legs — work with what the mesh actually has and report it honestly). The video it came from is `../out/scuttler-v1.mp4`; frames in `../frames/`.

Do this with Blender in background mode (`blender -b -P script.py`), writing your own bpy scripts:
1. Import `source.glb`. Inspect it: render it (`blender -b -P ../render_views.py -- source.glb views/v0`) and look at the PNGs. Count the legs, find where they join the body, check for fused geometry.
2. Normalise: scale so the body is about 1.4 m long, origin at ground centre, facing -Y, standing on z=0. Keep its texture. Keep it under 15k triangles. Do not remodel the creature; small cleanup (separating fused legs by cutting, removing floaters) is allowed — say what you did.
3. Rig it: one armature, a bone chain per visible leg plus body/head, skinned weights (automatic weights or your own; fix bleeding between neighbouring legs).
4. Animate two actions: `walk` (looping, 1 s, alternating gait across all legs, in place) and `die` (1 s, a clear collapse: body drops to the ground, legs curl in).
5. Export `scuttler_tripo.glb` (glTF binary, animations included, +Y up).
6. Check your own work: `blender -b -P ../render_views.py -- scuttler_tripo.glb views/v<N>` plus renders of mid-walk and end-of-die poses from the side. Look at them. Fix stretched texture, legs that drag body parts, torn geometry, floating parts.
Stop when it works or after 4 rounds. Record each round in `rounds.md`: what you saw, what you changed. End with a one-paragraph honest assessment: how well auto-rigging a generated mesh works compared with a creature modelled for rigging, what the deformation looks like up close, and what would need a human.
Unreal Engine 5 arena (greybox run, then art pass)
# Build "Scuttler Arena", a small first-person shooter in Unreal Engine 5.8, without ever opening the editor UI

You are working headless on a Mac (Apple M5, 16 GB RAM). Unreal Engine 5.8.4 and Xcode 26.6 (with the Metal toolchain) are installed and verified. Nobody can click anything in the editor for you: every asset, level and line of gameplay must come from C++ you write, Python you run inside the editor, and the `./ue` wrapper in this folder. You judge your own results by reading the screenshots and JSON reports the game writes, with the Read tool.

This is a scaled-down replay of a published experiment in which a model built a playable UE5 shooter with monsters it had modelled and rigged itself. The monsters and the weapon already exist as rigged GLB files; your job is the Unreal half.

## What already works (read these first, reuse their patterns)

`SmokeTest/` is a passing smoke test:
- `SmokeTest/Scripts/import_glbs.py` imports the three GLBs through Interchange with `AssetImportTask` (headless commandlet). The skinned meshes, skeletons and animation clips all come through with correct clip lengths. Animations land next to the mesh in `.../SkeletalMeshes/`, named `<file><clip>` (for example `scuttlerwalk`).
- `SmokeTest/Source/` is a minimal C++ game module (`AArenaWalker`, `UArenaSmokeLib`) and its Target/Build files.
- `SmokeTest/Scripts/render_smoke.py` builds a level from Python in the full editor and captures PNGs through a `SceneCapture2D` and `RenderingLibrary.export_render_target`.
- `SmokeTest/shots/*.png` are its output. Look at them: they show the problems listed below.

Known pitfalls, already solved, do not rediscover them:
1. Always build through `./ue build`. It sets `UE_TELEMETRY_DIR`; without it UBT 5.8 crashes after linking ("The value cannot be an empty string (Parameter 'path')").
2. A script run through `./ue editor` is executed with `-ExecutePythonScript`. The editor quits as soon as the script returns unless the script calls `unreal.EditorPythonScripting.set_keep_python_script_alive(True)`. Set it back to `False` when your tick callback is done, which lets the editor exit.
3. `export_render_target` writes a PNG with no file extension; rename it to `.png` before reading it.
4. Interchange warns "Node with a skinned mesh is not root. Parent transforms will not affect a skinned mesh." The rifle GLB has a 180 degree yaw on its root node, so expect the rifle and arms to come in rotated; fix orientation in the attachment transform, not by re-exporting.
5. The GLBs are in metres and arrive in UE centimetres. In the smoke test the Blender scuttler is about 254 x 213 x 129 cm and the Tripo scuttler about 174 x 183 x 119 cm. Decide on one sensible gameplay size (a knee-to-waist-high monster, roughly 80 to 120 cm long) and scale both to it.
6. The smoke-test shots are badly lit: models near black, floor blown out, streaky shadows. Causes are a near-black base colour on the Blender scuttler, auto exposure, and shadows captured before they settled. Fix lighting properly in the arena: fixed (manual) exposure, sensible sun and sky intensity, and wait enough frames before capturing.

## Assets (absolute paths)

- `<workdir>/game/scuttler.glb` — Blender-built scuttler, 45 bones, clips `walk` (1 s loop) and `die` (1 s). The default enemy.
- `<workdir>/arm-tripo/scuttler_tripo.glb` — Tripo mesh with a Claude-made rig, clips `walk` and `die`. Use it as a second enemy type (for example a faster, weaker variant tinted differently) so both routes are tested in Unreal.
- `<workdir>/arm-rifle/fp_rifle.glb` — first-person arms and rifle, two skinned meshes (`Arms`, `Rifle`) on one skeleton; clips `idle` (2 s), `fire` (0.15 s), `reload` (2 s), `draw` (0.5 s). There is a `Muzzle` node in the GLB; if it does not survive import as a bone or socket, add a socket at the muzzle yourself.
- `<workdir>/game/main.js` — the earlier three.js version of this game. Read it for gameplay numbers (speeds, health, wave sizes, walk time scale) so the two versions are comparable.

## What to build

Create a new C++ project `Arena/ScuttlerArena.uproject` (module `ScuttlerArena`, editor target `ScuttlerArenaEditor`, same plugin list as the smoke test). `./ue` already points at that path. Re-import the three GLBs into it.

Write all gameplay in C++. Do not author Blueprint graphs. Python is for asset import, materials, level assembly and capture.

1. **Arena level** `/Game/Maps/Arena`, set as the game default map. A walled arena about 40 x 40 m with some cover (pillars, crates), a floor with a material that reads clearly, a sun plus sky light plus atmosphere, fixed exposure, and the game mode set to yours. It should look intentional, not grey-box white.
2. **Player**: a first-person character. Mouse look, WASD, jump. Use Enhanced Input objects created in C++ at runtime (no input assets needed) or whatever works headless in 5.8. The arms and rifle mesh are attached to the camera and play `idle`, `fire` on each shot, `reload` on R or on an empty magazine, `draw` at spawn. 30-round magazine, hitscan line trace from the camera, around 10 shots per second, 100 health.
3. **Enemies**: spawned in waves at the arena edges, each wave larger. They chase the player (direct steering or navmesh, your choice), play `walk` with playback speed matched to their movement speed so the feet do not slide badly, hurt the player on contact, and play `die` once on death, then sink or fade out and are destroyed. Both enemy types appear.
4. **Feedback**: muzzle flash (a brief light plus a simple emissive mesh or particle), impact effect where the trace hits, a hit flash on enemies, simple sounds are optional.
5. **HUD**: health, ammo (current / magazine), wave number, kills. A C++ `AHUD` drawing on the canvas is enough.
6. **Autoplay test mode**, the most important part, because it is how you and I verify the game. When the game is started with `-autoplay`:
   - the player is invulnerable, turns towards the nearest enemy, fires, reloads when empty, and strafes a little;
   - every 5 seconds it saves a screenshot from the player camera to `Arena/Saved/Autoplay/shot-<seconds>.png` (find a capture method that works with `-RenderOffscreen`; a `SceneCapture2D` on the camera writing to a render target is a fallback);
   - when `-autoplaysecs=<n>` elapses (default 60) it writes `Arena/Saved/Autoplay/report.json` with at least: seconds run, average and minimum FPS, waves reached, kills per enemy type, shots fired, hits, reloads, max enemies alive, the player's final health, and any errors or warnings your code detected, and then quits cleanly.
   Run it with `./ue game 150 -autoplay -autoplaysecs=60`.
7. **Pose and look shots**: a Python script for `./ue editor` that captures the arena from a few viewpoints, each enemy type at three moments of `walk` and two of `die`, and the viewmodel at `idle`, `fire` and mid-`reload` from the player camera. Save to `Arena/Saved/Shots/`.

## How to work

- Small steps, building and running after each one. Keep `./ue` timeouts short while iterating.
- After every build, play or capture, actually look at the screenshots with Read and judge them as a player would: is it lit, can you see the monsters, are they the right size and facing their direction of travel, do the feet slide, is the rifle in a sane first-person position, does the HUD read. Fix what is wrong. Do not declare success from logs alone.
- Keep a log in `rounds.md`: each round, what you saw, what you changed, what the numbers were. This log is part of the deliverable.
- Budget: this run is capped at $50. Spend it on making the game work and look right, not on polish beyond the list above. If you get stuck on one problem for more than three attempts, write down what you tried in `rounds.md`, pick a simpler approach and move on.
- Do not install anything, do not touch anything outside `<workdir>/unreal/` except reading the asset files listed above.

## Finish

When the autoplay run passes (no crash, waves advance, kills of both types, fps reported, screenshots look right), write `RESULT.md` with: what was built, the final autoplay `report.json` numbers, the list of screenshots worth looking at, the known weaknesses you could not fix, and how a person can play it (`./ue game 600` opens it offscreen; to play with a window, the command to open it normally).

## Shell notes

`cat` and `ls` are aliased to tools that are not installed in this shell; use `/bin/cat` and `/bin/ls`, or the Read tool. Logs from `./ue` land in `logs/`; use `grep` and `tail` on them.


---- second run (art pass) ----

# Art pass on "Scuttler Arena": real level, boss, effects, atmosphere, and a gameplay video

You built `Arena/` (Scuttler Arena) in an earlier session: read `rounds.md` and `RESULT.md` first, then the code in `Arena/Source/` and the scripts in `Arena/Scripts/`. It works: autoplay reaches wave 4 with both enemy types at about 58 fps. But it looks like a grey box: walls, pillars and crates are coloured cubes, there is no boss, the effects are a point light and a blob. This session turns it into something that looks like a finished small shooter. Same rules as before: headless only, through `./ue`; you judge results by reading screenshots; keep `rounds.md` going (append a new part, "Art pass"); write gameplay in C++, assets and level assembly in Python.

## New assets (made in Blender in parallel sessions, read their rounds.md for details and known issues)

- `../arm-level/arena_kit.glb` — a modular sci-fi arena kit: floor tiles (plain and grate), 4 m wall and corner, pillar and broken pillar, low cover, crate, barrel cluster, spawn vent, ceiling beam, pipe run. Separate named nodes, baked textures, 2 m grid, origin bottom-centre. See `../arm-level/rounds.md` and its renders.
- `../arm-boss/brood_mother.glb` — the boss "Brood Mother", about 4 m long, rigged, clips `idle`, `walk`, `attack` (hit frame time is in `../arm-boss/rounds.md`), `roar`, `hit`, `die`. Glowing weak points on her back.

Import both. Import the kit as static meshes (one asset per piece; Interchange may combine nodes — make sure each piece ends up as its own static mesh with its origin kept, and fix materials so baked textures are used). Generate simple collision for the kit pieces.

## What to build

1. **Level**: rebuild `/Game/Maps/Arena` from the kit, in Python, on its 2 m / 4 m grid: about the same 40 x 40 m footprint and the same gameplay (cover in similar places, spawn points at the edges now at `Spawn_Vent` pieces). Walls with corners all around, pillars, cover clusters, grate sections, pipes on walls, beams overhead at the edges. Remove the old cube actors. Check from the player's eye height that there are no gaps, floating pieces or z-fighting.
2. **Boss**: after wave 3 is cleared, the Brood Mother crawls out of a vent, plays `roar`, then hunts the player: `walk` with play rate matched to speed, `attack` when close (damage applied at the hit frame, with a camera shake), `hit` flinch on taking a big hit (throttled), `die` when killed, then stays as a corpse. A boss health bar on the HUD. Hits on her weak points (the glowing material/bones on her back) do triple damage. Regular Scuttlers keep spawning in small numbers during the fight. After she dies, show "ARENA CLEARED" and keep the game running.
3. **Effects**: replace the current muzzle flash and impacts with Niagara effects if you can create and configure Niagara systems headlessly (from Python or C++, for example by duplicating and editing engine template systems); if that is not workable after a fair try, build them in C++ from simple meshes, materials and lights, and say so in rounds.md. Needed: muzzle flash, sparks plus a small decal on walls, green-yellow ichor burst on monster hits, a bigger burst when a monster dies, dust and debris when the boss slams.
4. **Atmosphere**: exponential height fog with volumetric light, the kit's emissive strips and the vents glowing, a few local lights (cool cyan along walls, warm orange at vents), post-processing (slight bloom, vignette, colour grading towards cool blue-green with warm highlights), fixed exposure tuned for the new level. Monsters (brown and red) must still stand out clearly against the environment. Keep the frame rate above 45 fps average in autoplay; say what each feature costs if you measure it.
5. **Autoplay** must now reach the boss and kill her: let the bot aim for her weak points when she is the target, and pass `-autoplaysecs` large enough. Extend `report.json` with: boss spawned (time), boss killed (time), boss attacks landed, weak-point hits.
6. **Video**: record a 30–45 s gameplay video from the player camera covering normal waves and the boss fight: capture frames at a fixed rate during an autoplay run (for example a `-capturevideo` flag that saves every Nth frame at a fixed time step, or a fixed-framerate benchmark mode), then assemble with `ffmpeg -framerate 30 -i ... -c:v libx264 -pix_fmt yuv420p -crf 20 Arena/Saved/Video/gameplay.mp4`. Also save 8–10 good stills to `Arena/Saved/Final/`: overview of the level, eye-height views, a wave in progress, the boss roar, the boss attack, a weak-point hit, the boss death, the cleared screen.

## How to work

- Order: import and level first (check stills), then atmosphere (check stills), then effects, then the boss, then the video. Build and run after each step.
- Look at every screenshot you make with Read and judge it as a player and as an art director: does it look like a finished game, are monsters readable, is the boss impressive, is anything broken. Fix what is wrong. Do not declare success from logs alone.
- Budget: this run is capped at $25. If one thing blocks you for more than three attempts, write down what you tried, take a simpler route and move on.
- Do not install anything. Only write inside `<workdir>/unreal/`. `ffmpeg` is available.
- `cat` and `ls` are aliased to tools that are not installed in this shell; use `/bin/cat` and `/bin/ls`, or the Read tool.

## Finish

Update `RESULT.md` with an "Art pass" section: what changed, the final autoplay report numbers, fps before and after, the video path and length, the stills, and the known weaknesses.
Sci-fi level kit (Blender)
# Model a modular sci-fi arena kit in Blender for an Unreal Engine 5 shooter

You are making the environment art for "Scuttler Arena", a small first-person shooter in UE 5.8. Today the arena is built from plain coloured cubes; your kit replaces them. Work only in this folder. Use Blender in background mode (`blender -b -P script.py`), writing your own bpy scripts. Look at `../unreal/Arena/Saved/Shots/arena-overview.png` and `../unreal/Arena/Saved/Autoplay/shot-035.png` first to see the current grey-box arena and its scale.

## Setting

An industrial alien-hive containment arena on a space station: dark gunmetal and worn painted-steel panels, hazard-stripe trims, recessed cool-cyan light strips, a few warm orange warning lights, grated floor sections, pipes and vents. The swarm monsters are brown and red, so keep the environment cool (blue-grey, cyan) for contrast. It should read clearly at gameplay distance: strong shapes, bevelled edges that catch light, not noise.

## Pieces (each a separate object, origin at bottom-centre, metres, +Z up, built on a 2 m grid)

1. `Floor_Tile_4m` — 4 x 4 m panel with seams and a few bolts; `Floor_Grate_4m` variant with a grated centre over a darker pit.
2. `Wall_4m` — 4 m wide, 6 m tall, 0.5 m deep, panelled, with a recessed light strip (separate emissive material slot); `Wall_Corner` for 90 degree corners.
3. `Pillar` — about 1.2 x 1.2 x 6 m structural column with light rings; `Pillar_Broken` variant shorter with a jagged top.
4. `Cover_Low` — waist-high barrier, 3 m long, 1.1 m tall; `Cover_Crate` — 1.5 m cargo crate with hazard stripes; `Cover_Barrel` — fuel canister cluster.
5. `Spawn_Vent` — a 3 m wide floor or wall vent where monsters crawl out, with an orange glow inside.
6. `Ceiling_Beam` — 8 m truss beam to hang over the arena edges (optional depth).
7. `Prop_Pipes` — a 4 m pipe run that can be attached to walls.

## Technical requirements

- Real-time friendly: each piece under 3k triangles (walls and floor under 1.5k), total kit under 25k.
- Materials: at most 4 shared materials for the whole kit (for example `M_Metal`, `M_Painted`, `M_Emissive`, `M_Hazard`). Give each a baked texture set at 1024 px (base colour, roughness/metallic packed or separate, normal) made from procedural Blender nodes, bevel normals and edge wear, baked with Cycles to proper UV-unwrapped islands. Base colours no darker than about 0.08 linear: the previous assets came out near black in Unreal.
- Bevel or weighted normals so edges catch light; no n-gons that triangulate badly.
- Export one `arena_kit.glb` (glTF binary, all pieces as separate named nodes, textures embedded, +Y up) and also `arena_kit.blend`.

## Check your own work

Each round render: (a) every piece on its own on a grey floor, (b) a small sample layout (a corner of the arena: floor tiles, two walls with a corner, a pillar, cover, a vent) seen from eye height (1.7 m) and from above at three-quarters. Read the PNGs and judge them as an environment artist: readable silhouettes, believable scale next to a 1.8 m person (add a simple capsule for scale in the layout render), textures not stretched, light strips glowing, enough contrast against brown and red monsters. Fix what is wrong. Record each round in `rounds.md` (what you saw, what you changed). Stop when it looks right or after 4 rounds, and end `rounds.md` with an honest assessment and a table of every piece with its triangle count.
Boss creature (Blender)
# Model, rig and animate the boss monster in Blender for an Unreal Engine 5 shooter

You are making the boss for "Scuttler Arena", a small first-person shooter in UE 5.8. The regular enemy is the Scuttler, described in `../creature.txt`; its finished model is `../game/scuttler.glb` (look at `../unreal/Arena/Saved/Shots/scuttler-walk-side.png` and `../arm-video/views/` for how it looks). Work only in this folder. Use Blender in background mode (`blender -b -P script.py`), writing your own bpy scripts.

## The boss: "Brood Mother"

The queen of the Scuttler swarm, same design language so it obviously belongs to the same species: an armoured tick, but about 4 m long and 2.5 m tall. Domed, segmented, cracked shell in charcoal and dark brown, with glowing orange-red sacs or vents along the back (her weak points), a heavy head with large mandibles and the same ring of reddish-brown bristles around the mouth, five thick clawed legs on each side (count them: ten legs), plus two large front scythe-like forelimbs she uses to attack. She should look heavier and more dangerous than the regular Scuttler, not just a scaled copy.

## Requirements

1. Model `brood_mother.blend`: under 25k triangles, at most 3 materials (shell, flesh/legs, emissive weak points). Bake textures (base colour, normal, roughness) at 1024–2048 px from procedural nodes and a high-detail sculpt or displacement if you can, onto a proper UV unwrap. Base colours no darker than about 0.08 linear: earlier assets came out near black in Unreal. Origin at ground centre, facing -Y, metres, standing on z=0.
2. Rig: one armature with body, head, mandibles, a chain per leg, the two forelimbs, and a few shell/abdomen bones for secondary motion. Clean skin weights (no neighbouring legs dragging each other, no shell tearing).
3. Animate, all in place:
   - `idle` (2 s loop): breathing, mandibles twitch, weak points pulse is fine to leave to the engine.
   - `walk` (1.2 s loop): heavy, deliberate gait across all ten legs, body sway.
   - `attack` (1.2 s): rears up and slams both forelimbs down in front of her (the hit frame is about 0.6 s — write the exact time in rounds.md).
   - `roar` (1.5 s): rears up, mandibles open wide, used when she enters.
   - `hit` (0.4 s): flinch.
   - `die` (2 s): collapses heavily, legs curl in, ends still and fully on the ground (nothing under the floor).
4. Export `brood_mother.glb` (glTF binary, all six animations, +Y up). Make sure each animation's timeline starts at 0.

## Check your own work

Each round: `blender -b -P ../render_views.py -- brood_mother.glb views/v<N>` (front, side, back, three-quarter), plus side renders of key poses: walk at 0/0.3/0.6/0.9 s, attack at 0.3 and the hit frame, roar peak, die end. Also render her next to `../game/scuttler.glb` for scale. Read the PNGs. Count the legs. Fix wrong leg count, floating parts, broken weights, limbs through the shell, feet under the floor, poses that do not read. Record each round in `rounds.md` (what you saw, what you changed). Stop when it looks right or after 4 rounds, and end `rounds.md` with an honest assessment (triangles, bones, materials, what each clip looks like, what would still need a human).
Citation
Please cite this post as:
@misc{yang2026agentgameassets,
  author = {Yang, Shan},
  title  = {Rebuilding an AI Shooter: 4.7 Agent-Hours vs. 50–80 Person-Days},
  year   = {2026},
  month  = {Nov},
  url    = {https://shanyang.me/blog/agent-built-game-assets/}
}